OpenSSH configuration
Outline
Installation
The OpenSSH package provides encrypted shell access and file transfer on Unix platforms. It is installed by default in Linux distributions as it represents the primary way to remotely manage a server. In Ubuntu, run the following command to see the installed version.
root@myhost:~# apt list openssh-client openssh-server openssh-sftp-server
Listing... Done
openssh-client/jammy,now 1:8.9p1-3 amd64 [installed]
openssh-server/jammy,now 1:8.9p1-3 amd64 [installed]
openssh-sftp-server/jammy,now 1:8.9p1-3 amd64 [installed]
The configuration directory is /etc/ssh. The ssh server has a standard configuration in the file sshd_config. Since the openssh system is based on asymmetric encryption, the server is identified by a set of private keys generated at the first run with different algorithms (DSA, Elliptic Curve DSA, Curve 25519, RSA).
The host private-public key-pairs are saved in the configuration directory, as shown in the following.
root@myhost:~# cd /etc/ssh
root@myhost:/etc/ssh# ll ssh_host_*
-rw------- 1 root root 1381 Nov 14 15:46 ssh_host_dsa_key
-rw-r--r-- 1 root root  601 Nov 14 15:46 ssh_host_dsa_key.pub
-rw------- 1 root root  505 Nov 14 15:46 ssh_host_ecdsa_key
-rw-r--r-- 1 root root  173 Nov 14 15:46 ssh_host_ecdsa_key.pub
-rw------- 1 root root  399 Nov 14 15:46 ssh_host_ed25519_key
-rw-r--r-- 1 root root   93 Nov 14 15:46 ssh_host_ed25519_key.pub
-rw------- 1 root root 2590 Nov 14 15:46 ssh_host_rsa_key
-rw-r--r-- 1 root root  565 Nov 14 15:46 ssh_host_rsa_key.pub
In addition, each user in the system can have his/her own identity saved in the directory ~/.ssh/, as well as a list of authorized public keys collected in the file authorized_keys. Having an indentity in the form of a key allows the user to login in the system by means of the key instead of the classical password, thus incresing the security. We will see how to configure the key-based login in the sequel.
Host keys update
At the first run, the ssh generates a new set of private-public key-pairs. In some cases, it could be needed to generate new keys. A classical example is when we want an RSA key larger than the default one, that is 2048 bits.
root@myhost:~# cd /etc/ssh
root@myhost:/etc/ssh# systemctl stop ssh.service
root@myhost:/etc/ssh# for i in $(ls ssh_host_*); do mv $i $i.backup; done
root@myhost:/etc/ssh# ssh-keygen -q -N "" -t dsa -f /etc/ssh/ssh_host_dsa_key
root@myhost:/etc/ssh# ssh-keygen -q -N "" -t rsa -b 4096 -f /etc/ssh/ssh_host_rsa_key
root@myhost:/etc/ssh# ssh-keygen -q -N "" -t ecdsa -f /etc/ssh/ssh_host_ecdsa_key
root@myhost:/etc/ssh# ssh-keygen -q -N "" -t ed25519 -f /etc/ssh/ssh_host_ed25519_key
root@myhost:/etc/ssh# systemctl start ssh.service
Try systemctl status ssh.service to verify that the ssh server restarted correctly, then the backup files can be removed at your convenience by running rm -i *.backup.
SSH server customization
The SSH server is installed with a default configuration that canbe customized to enhance security. The configuration file is sshd_config and can be easily edited with nano /etc/ssh/sshd_config. In the following, the relevant blocks are discussed.
The first block reports the defaults related to the network connection.
#Port 22
#AddressFamily any
#ListenAddress 0.0.0.0
#ListenAddress ::
As can be seen, the dafault port of SSH is 22, and the server is generally configured to listen on all the addresses, thst is, all the interfaces. Multiple Port options can be specified, as well as multiple ListenAddress options that can be also expressed in terms of address:port syntax. The option AddressFamily specifies the IP protocol and can take value inet for IPv4, inet6 for IPv6, and any (the default) for both of the two.
So, supposing that we have a server with four interfaces identified by the IPv4 addresses 10.10.10.10, 10.10.20.20, 10.10.30.30, 10.10.40.40, and we want the SSH server listening by deafult on ports 22 and 2022, but only on port 3022 for the IP 10.10.30.30 and only on port 4022 for the IP 10.10.40.40, only enabling IPv4 protocol, we can modify the prevoius options as in the following.
Port 22
Port 2022
AddressFamily inet
ListenAddress 0.0.0.0
ListenAddress 10.10.30.30:3022
ListenAddress 10.10.40.40:4022
#ListenAddress ::
Another important block is the one related to users (and root) authentication. In the following, the base configuration is reported with some customizations to increase the security level.
# Authentication:

#LoginGraceTime 2m
PermitRootLogin prohibit-password
#StrictModes yes
#MaxAuthTries 6
#MaxSessions 10

PubkeyAuthentication yes

# Expect .ssh/authorized_keys2 to be disregarded by default in future.
#AuthorizedKeysFile     .ssh/authorized_keys .ssh/authorized_keys2

#AuthorizedPrincipalsFile none

#AuthorizedKeysCommand none
#AuthorizedKeysCommandUser nobody

# For this to work you will also need host keys in /etc/ssh/ssh_known_hosts
#HostbasedAuthentication no
# Change to yes if you don't trust ~/.ssh/known_hosts for
# HostbasedAuthentication
#IgnoreUserKnownHosts no
# Don't read the user's ~/.rhosts and ~/.shosts files
#IgnoreRhosts yes

# To disable tunneled clear text passwords, change to no here!
PasswordAuthentication yes
PermitEmptyPasswords no
As can be seen, to increase the security, the plain password login fot the root has been disabled. In this way, the root can only login with a valid private-public key-pair whose public key must be added to the file ~/.ssh/authorized_keys as we will see in the sequel. It is furthermore advisable to disable plaintext password login for users, by setting PasswordAuthentication no, if there are not users needing it for logging in.
Finally, in the last part of the file, the Secure File Transfer Protocol (SFTP) can be enabled by setting it as a subsystem. Typically, it is enabled by default by means of the following line (comment it out if you want to disable SFTP).
Subsystem sftp /usr/lib/openssh/sftp-server
Don't forget to run systemctl restart ssh.service every time the configuration file is modified.
Key-pair generation
The command ssh-keygen can be used to generate user keys. Suppose that we want to generate a key-pair for the user root in the host myhost. To do so, open a command prompt (e.g. through a local login) and run the following command.
root@myhost:~# ssh-keygen -t rsa -b 2048 -N "" -C "root@myhost"
Generating public/private rsa key pair.
Enter file in which to save the key (/root/.ssh/id_rsa): HIT_ENTER
Your identification has been saved in /root/.ssh/id_rsa
Your public key has been saved in /root/.ssh/id_rsa.pub
The key fingerprint is:
SHA256:sCz73jTFm12UIyQiQ9VL5gJjpxhYg9Z67SOIBk6jRpg root@myhost
The key's randomart image is:
+---[RSA 2048]----+
|   =o.+.o.. .    |
|  + o.+o..+o   . |
|.o . =.= + .. +  |
|E+. o.oo..o  o . |
|*..o..o S.o   .  |
|o+. .oo  . + .   |
|o   .. .o o .    |
|     . o .       |
|     .o .        |
+----[SHA256]-----+
The -t option allows to chose the key algorithm among rsa, dsa, ecdsa, and ed25519. The dsa should not be used unless you need compatibility with old SSH servers. If you want to use elliptic curve based algorithms, the ed25519 is preferable over the ecdsa, but it is rather new and could not be supported by some clients. In general, the rsa still remains the most suitable choice.
The -b option allows to set the size of the key, that is strictly dependent by the algorithm used. For the rsa, the maximum allowed is 8192 bits, while a size of at least 2048 bits is advisable. The ecdsa only accepts sizes of 256, 384, or 521 bits, while the ed25519 has a fixed key size that cannot be changed.
The -C option allows to set a comment, that takes the meaning of the common identifier of the key. It defaults to user@host format but, when a personal key pair is created, it can be conveniently set to the fully qualified email address of the person.
The option -N "" tells ssh-keygen to set a null passphrase for the private key, that is, to leave it unencrypted. For safety reason, it is strongly advisable to always encrypt the private key by entering a secret. To do this, run the following command:
root@myhost:~# ssh-keygen -p -f .ssh/id_rsa
Key has comment 'root@myhost'
Enter new passphrase (empty for no passphrase): TYPE_A_SECRET
Enter same passphrase again: RETYPE_THE_SECRET
Your identification has been saved with the new passphrase.
By default for the specific user, the private rsa key is saved in ~/.ssh/id_rsa while the public key in ~/.ssh/id_rsa.pub files. Those files are the ones read by default by the ssh command. For safety reason, it is strongly advisable to always encrypt the private key by entering a secret. While the private key must be kept confidential, the public one can be safely distributed.
The private key is a multi-line text of the following form:
root@myhost:~# cd .ssh/
root@myhost:~/.ssh# cat id_rsa
-----BEGIN OPENSSH PRIVATE KEY-----
b3BlbnNzaC1rZXktdjEAAAAACmFlczI1Ni1jdHIAAAAGYmNyeXB0AAAAGAAAABAEKJ6jfF
dWkLw/a4ngfk21AAAAEAAAAAEAAAEXAAAAB3NzaC1yc2EAAAADAQABAAABAQC8ALeVopu3
v0xZir63K2m2WemNnmtobgYXkNH7ZkLv10ule8iFeIHIycC8coxsY/aj0CP6Trm8gNQjEF
...
...
...
rTOyAFuYRz8HAMcsg2LYdtFKwX5TUWFPL4yYcsxL7rlZp6cXOazswGkuF6nmnVpIZmcEsa
Cs8scmgih2J5+DxQlXm88guRMUO0DBDr4eBiQ+KR1qF5J2xObYx1AAdPkosnzuP4gRKGHo
YLM/Ex1T2m2VvRRJdPz2Q+JkrJ2ys=
-----END OPENSSH PRIVATE KEY-----
Conversely, the public key is a single line of text divided in three parts.
root@myhost:~/.ssh# cat id_rsa.pub
ssh-rsa AAAAB3NzaC1yc2EAAAADAQABAAABA.........A5NmxOHFOJdHsEhzWFUEJRm9 root@myhost
The first part identifies the algorithm, the second part is the public key itself while the last part is the comment (i.e. the human readable name given to the key). The single-line format facilitates the packing of public keys in the ~/.ssh/authorized_keys containing all the public keys that are allowed to login in the host as the current user.
So, if we want that someone can be authenticated as root in the host myhost with our newly created id_rsa key, we must create the authorized_keys file (if not already present), and adding the id_rsa.pub public key to it.
root@myhost:~/.ssh# ls -la
total 20
drwx------ 2 root root    4 Jan 12 19:09 .
drwx------ 5 root root   10 Jan 12 15:29 ..
-rw------- 1 root root 1876 Jan 12 13:12 id_rsa
-rw-r--r-- 1 root root  393 Jan 12 13:12 id_rsa.pub
root@myhost:~/.ssh# touch authorized_keys
root@myhost:~/.ssh# chmod 600 authorized_keys
root@myhost:~/.ssh# cat id_rsa.pub >> authorized_keys
root@myhost:~/.ssh# ls -la
total 25
drwx------ 2 root root    5 Jan 12 19:11 .
drwx------ 5 root root   10 Jan 12 15:29 ..
-rw------- 1 root root  393 Jan 12 19:11 authorized_keys
-rw------- 1 root root 1876 Jan 12 13:12 id_rsa
-rw-r--r-- 1 root root  393 Jan 12 13:12 id_rsa.pub
Now the SSH server of myhost will authenticate as root any client owning the private key contained in id_rsa.
Let's now suppose that we want to create a personal key for the user Henry Smith and allowing him to be authenticated as root on the host myhost. First, we need to create the key-pair:
root@myhost:~/.ssh# ssh-keygen -t rsa -b 2048 -N "" -C "henry.smith@mycompany.com"
Generating public/private rsa key pair.
Enter file in which to save the key (/root/.ssh/id_rsa): henry_rsa
Your identification has been saved in henry_rsa
Your public key has been saved in henry_rsa.pub
The key fingerprint is:
SHA256:z6snzRO+xGmkoRBqX26yhaQ5ASZn0tw1PqXStHaRBzw henry.smith@mycompany.com
The key's randomart image is:
+---[RSA 2048]----+
|      +.+o       |
| o . = =E..      |
|+.= + B .o       |
|o= . + o         |
|  + o . S .      |
| . * = . B..     |
|  + + = .+B.     |
|   . =  .o*.     |
|    .   .+oo     |
+----[SHA256]-----+
root@myhost:~/.ssh# ssh-keygen -p -f henry_rsa
Key has comment 'henry.smith@mycompany.com'
Enter new passphrase (empty for no passphrase): HENRY'S_KEY_PASSPHRASE
Enter same passphrase again: HENRY'S_KEY_PASSPHRASE
Your identification has been saved with the new passphrase.
Then, the public key in henry_rsa.pub must be added to the file authorized_keys:
root@myhost:~/.ssh# ls -la
total 43
drwx------ 2 root root    7 Jan 12 19:37 .
drwx------ 5 root root   10 Jan 12 15:29 ..
-rw------- 1 root root  393 Jan 12 19:11 authorized_keys
-rw------- 1 root root 1831 Jan 12 19:32 henry_rsa
-rw-r--r-- 1 root root  407 Jan 12 19:32 henry_rsa.pub
-rw------- 1 root root 1876 Jan 12 13:12 id_rsa
-rw-r--r-- 1 root root  393 Jan 12 13:12 id_rsa.pub
root@myhost:~/.ssh# cat henry_rsa.pub >> authorized_keys
root@myhost:~/.ssh# cat authorized_keys
ssh-rsa AAAAB3NzaC1yc2EAAAADAQABAAABAQC8ALeV.........QEiA5NmxOHFOJdHsEhzWFUEJRm9 root@myhost
ssh-rsa AAAAB3NzaC1yc2EAAAADAQABAAABAQCVtka0.........EJ2OFp/zHDZD6qAc4keYc3OhUwp henry.smith@mycompany.com
As can be seen, now authorized_keys contains both of the public keys, so both of them are considered valid to authenticate a client as root on the host myhost. What remains to do is to confidentially give to Henry Smith both of henry_rsa and henry_rsa.pub files and also the secret passphrase used to encrypt the private key.
Establishing connections with the OpenSSH client
Let us consider two hosts, myhost and otherhost, having IP addresses 10.10.50.10 and 10.10.50.20, respectively. Suppose that we are logged in myhost and we want to connect to otherhost through SSH. Suppose that the user henry exists in both of the hosts (see adduser manpage to learn how to add a user).
Since normal SSH installations enable by default password login for regular users, the simplest way to log as user henry in otherhost from myhost is by running:
henry@myhost:~$ ssh -l henry -p 22 10.10.50.20
The authenticity of host '10.10.50.20 (10.10.50.20)' can't be established.
ED25519 key fingerprint is SHA256:4D52FN1ElUr3TviZSeVpM6OxRCfKcNoIWOKROqNc4Bc.
This key is not known by any other names
Are you sure you want to continue connecting (yes/no/[fingerprint])? yes
Warning: Permanently added '10.10.50.20' (ED25519) to the list of known hosts.
henry@10.10.50.20's password: HENRY'S_PASSWORD_ON_OTHERHOST
Welcome to Ubuntu 22.04.1 LTS (GNU/Linux 5.15.74-1-pve x86_64)

   * Documentation:  https://help.ubuntu.com
   * Management:     https://landscape.canonical.com
   * Support:        https://ubuntu.com/advantage

The programs included with the Ubuntu system are free software;
the exact distribution terms for each program are described in the
individual files in /usr/share/doc/*/copyright.

Ubuntu comes with ABSOLUTELY NO WARRANTY, to the extent permitted by
applicable law.

henry@otherhost:~$
Looking at the ssh command, the -p option specifies the listening port on the remote host (22 is in any case the default for the ssh protocol), while the -l option specifies the login name. If the -l option is omitted, the login name defaults to the name of the current user in the local host. If nothing else is written after the remote host IP address (or its DNS hostname), the ssh command returns a shell on the remote host (as happened in our case); alternatively, if something else is written between double quotes, it will be executed as a command in the remote host (we will see this kind of use in the sequel).
Looking at the output, it can be seen that every time a connection to a new host is attempted, the system asks whether or not its public key should be added to the list of known hosts, i.e. if the remote host should be considered as a trusted host from now on. Notice that the SSH system is saving the public key of otherhost, that is, the ones stored in /etc/ssh/ on otherhost. Let's see them:
henry@myhost:~$ cd .ssh/
henry@myhost:~/.ssh$ ls -la
total 20
drwx------ 2 henry henry    4 Jan 18 19:24 .
drwxr-x--- 4 henry henry   11 Jan 20 11:41 ..
-rw------- 1 henry henry 1150 Jan 18 19:24 known_hosts
-rw-r--r-- 1 henry henry  142 Jan 18 19:24 known_hosts.old
henry@myhost:~/.ssh$ cat known_hosts
|1|eqImgMK9gMCgu4x13QuY1jc8GYY=|91glUk3E42t17WT4nOS2Ou5rcZU= ssh-ed25519 AAAAC3NzaC.........d5BLnArPUx
|1|rc6R5UssREIsYpYWatknuKC+4jk=|usFXRsEimkxrvEFKvHuVCunadSg= ssh-rsa AAAAB3NzaC.........8SWpNF3Q==
|1|48rLcaeNZMhNmYc6ZiWnjzTnlVk=|iCQFjR4zFsAKSV7fYEsnfAbZfHc= ecdsa-sha2-nistp256 AAAAE2VjZH.........HOqOxiedM=
In this example, the user henry logged in otherhost using a plain password authentication mechanism. If a public key authentication mechanism is desired for the user henry, his public key must be added to .ssh/authorized_keys in his home directory on otherhost, that typically is /home/henry/.ssh/authorized_keys.
Let's now suppose that the user henry has a fully set up ssh environment in myhost, meaning that he has a key pair saved in the .ssh directory. We can use the previously created keys henry_rsa and henry_rsa.pub renaming them id_rsa and id_rsa.pub, respectively. Then, the local situation is:
henry@myhost:~/.ssh$ pwd
/home/henry/.ssh
henry@myhost:~/.ssh$ ls -la
total 30
drwx------ 2 henry henry    6 Jan 20 11:53 .
drwxr-x--- 4 henry henry    9 Jan 20 11:53 ..
-rw------- 1 henry henry 1831 Jan 20 11:41 id_rsa
-rw-r--r-- 1 henry henry  407 Jan 20 11:41 id_rsa.pub
-rw------- 1 henry henry 1150 Jan 18 19:24 known_hosts
-rw-r--r-- 1 henry henry  142 Jan 18 19:24 known_hosts.old
We now need to send the id_rsa.pub to otherhost, and then putting it in .ssh/authorized_keys. To do this:
henry@myhost:~/.ssh$ cat id_rsa.pub | ssh 10.10.50.20 "cat > my_key.pub"
henry@10.10.50.20's password: HENRY'S_PASSWORD_ON_OTHERHOST
henry@myhost:~/.ssh$ ssh 10.10.50.20
henry@10.10.50.20's password: HENRY'S_PASSWORD_ON_OTHERHOST
henry@otherhost:~$ ls -la
total 36
drwxr-x--- 3 henry henry    8 Jan 20 12:10 .
drwxr-xr-x 3 root  root     3 Jan 18 19:12 ..
-rw------- 1 henry henry   29 Jan 20 12:08 .bash_history
-rw-r--r-- 1 henry henry  220 Jan 18 19:12 .bash_logout
-rw-r--r-- 1 henry henry 3771 Jan 18 19:12 .bashrc
drwx------ 2 henry henry    3 Jan 18 19:24 .cache
-rw-r--r-- 1 henry henry  807 Jan 18 19:12 .profile
-rw-rw-r-- 1 henry henry  407 Jan 20 12:10 my_key.pub
As can be seen, we have sent the content of the file id_rsa.pub to the stdout (standard output) in the current shell to the stdin (standard input) in the remote shell that passed it to the cat command that eventually directed it in the file my_key.pub.
What remains to do is to move the public key into .ssh/authorized_keys, also creating the requested files and directories if needed.
henry@otherhost:~$ mkdir .ssh
henry@otherhost:~$ chmod 700 .ssh/
henry@otherhost:~$ cd .ssh/
henry@otherhost:~/.ssh$ touch authorized_keys
henry@otherhost:~/.ssh$ chmod 600 authorized_keys
henry@otherhost:~/.ssh$ cat ../my_key.pub >> authorized_keys
henry@otherhost:~/.ssh$ ls -la
total 11
drwx------ 2 henry henry   3 Jan 20 12:26 .
drwxr-x--- 4 henry henry   9 Jan 20 12:24 ..
-rw------- 1 henry henry 407 Jan 20 12:26 authorized_keys
Now, we can exit from otherhost and try a new login with our identity represented by the private key in .ssh/id_rsa.
henry@myhost:~$ ssh -l henry -i .ssh/id_rsa 10.10.50.20
Enter passphrase for key '.ssh/id_rsa': HENRY'S_KEY_PASSPHRASE
henry@otherhost:~$
The -i option specifies the file containing the private key to be used as identity. If the private key had been unencrypted, the login would have been immediate, thus without any additional prompt to the user.
Configuring 'root' access through SSH
Since modern SSH server default configurations prohibit password login for the root, we cannot directly login as root through SSH in a newly installed host until our public key is included in /root/.ssh/authorized_keys.
There are two main possibilities to have our public key put in /root/.ssh/authorized_keys:
- our public key was asked by the installation precess during host installation, and the installation program automatically added it in /root/.ssh/authorized_keys;
- the installation process forced us to create a regular user for which a plain password login is possible. Typically, this regular user is added to the sudo group to allow it running commands on behalf of the root for administration purposes. This is done by using the sudo command.
If we fall in the first case, there is nothing more to do. We can login as root by using our private key as identity.
Suppose now that we are in the second case, so we need to manually install our public key. Let's suppose that our newly installed host is exactely otherhost and that the regular user created during the installation process is exactely henry. Suppose that we already copied henry's public key to otherhost as we did in the prevoius section.
What remains to do is elevating henry to the root and copy the public key. To do this:
henry@myhost:~$ ssh -l henry -i .ssh/id_rsa 10.10.50.20
Enter passphrase for key '.ssh/id_rsa': HENRY'S_KEY_PASSPHRASE
henry@otherhost:~$ sudo su -l
[sudo] password for henry: HENRY'S_PASSWORD_ON_OTHERHOST
root@otherhost:~# cd .ssh/
root@otherhost:~/.ssh# ls -la
total 10
drwx------ 2 root root  2 Jan 20 19:32 .
drwx------ 5 root root 10 Jan 12 08:54 ..
root@otherhost:~/.ssh# touch authorized_keys
root@otherhost:~/.ssh# chmod 600 authorized_keys
root@otherhost:~/.ssh# cat /home/henry/.ssh/authorized_keys >> authorized_keys
root@otherhost:~/.ssh# ls -la
total 15
drwx------ 2 root root   3 Jan 20 19:33 .
drwx------ 5 root root  10 Jan 12 08:54 ..
-rw------- 1 root root 407 Jan 20 19:33 authorized_keys
root@otherhost:~/.ssh# exit
logout
henry@otherhost:~$ exit
logout
Connection to 10.10.50.20 closed.
Now Henry can log in otherhost as root by simply using his identity id_rsa:
henry@myhost:~$ ssh -l root -i .ssh/id_rsa 10.10.50.20
Enter passphrase for key '.ssh/id_rsa': HENRY'S_KEY_PASSPHRASE
root@otherhost:~#
Remote command execution by public key
The SSH system makes it possible the execution of commands on the remote host on a public key based identification. This is obtained by prepending the string command="... a command ..." to the row containing the target public key in authorized_keys in the remote host. Hence, every time a connection is attempted with the related private key, the execution of the specified command is triggered and no shell is returned. This behaviour is particularly useful when we want to trigger some specific action on the remote host such as, e.g., a shutdown or a reboot.
Let's show how to implement this. We consider to operate as user henry on myhost and we want to trigger a command as root on otherhost. First, we need to create a specific key-pair. In this case, it is advisable to leave the private key unencrypted, especially if we need that the command is triggered by some automated procedure on myhost that obviously would not be able to input the passphrase (imagine a daemon that monitors an UPS and needs to shutdown a set of remote hosts when the battery level drops below a certain threshold).
henry@myhost:~$ ssh-keygen -t rsa -b 2048 -N "" -C "remote_cmd"
Generating public/private rsa key pair.
Enter file in which to save the key (/home/henry/.ssh/id_rsa): /home/henry/.ssh/remote_cmd
Your identification has been saved in /home/henry/.ssh/remote_cmd
Your public key has been saved in /home/henry/.ssh/remote_cmd.pub
The key fingerprint is:
SHA256:IX4y+Fkf6hu1f1JJ6eYkLHc65XdWXr8DNOKRw6i//Tk remote_cmd
The key's randomart image is:
+---[RSA 2048]----+
|                 |
|                 |
|      . . o .  . |
|     o . o * oo  |
|    . + S +.=o.. |
|     . B +.++.O o|
|      o + oo @..+|
|       . o..+E=.*|
|        oo..o*.++|
+----[SHA256]-----+
Now suppose that we want the command echo Hello world is the one to be triggered on otherhost. We then need to add to /root/.ssh/authorized_keys on otherhost a row containing the public key in /home/henry/.ssh/remote_cmd.pub with the string command="echo Hello world" prepended to itself. We can do this in a single shot:
henry@myhost:~$ echo "command=\"echo Hello world\" "$(cat .ssh/remote_cmd.pub) | ssh -l root -i .ssh/id_rsa 10.10.50.20 "cat >> /root/.ssh/authorized_keys"
Enter passphrase for key '/home/henry/.ssh/id_rsa': HENRY'S_KEY_PASSPHRASE
We can easily verify the result.
henry@myhost:~$ ssh -l root -i .ssh/id_rsa 10.10.50.20 "cat /root/.ssh/authorized_keys"
Enter passphrase for key '/home/henry/.ssh/id_rsa': HENRY'S_KEY_PASSPHRASE
ssh-rsa AAAAB3NzaC1yc2EAAAADAQABAAABAQCVtka0FTYd.........keYc3OhUwp henry.smith@mycompany.com
command="echo Hello world" ssh-rsa AAAAB3NzaC1yc2EAAAADAQABAAABAQDrs5m05wAo.........O7W5ne7ZN1 remote_cmd
Now, if we try to log in as root on otherhost with the identity remote_cmd, the command echo Hello world is triggered and no shell is returned, as can be noticed by the output of the following command.
henry@myhost:~$ ssh -l root -i .ssh/remote_cmd 10.10.50.20
Hello world
Connection to 10.10.50.20 closed.
If the command systemctl poweroff was used instead of echo Hello world, the host otherhost would have been powered off.
Transferring files over SSH
The OpenSSH suite provides the command sftp for transferring files over. It creates an ssh connections so that files can be transferred over an encrypted channel.
henry@myhost:~$ sftp -i .ssh/id_rsa -C -P 22 10.10.50.20
Enter passphrase for key '.ssh/id_rsa': HENRY'S_KEY_PASSPHRASE
Connected to 10.10.50.20.
sftp>
The syntax of the sftp is very similar to that of the ssh command, apart some slight differences (e.g., -P instead of -p for specifing the port).
The -C option enables the compression, that can be useful when transferring files.
The usage of sftp is very similar to that of ftp. More insights can be found by running man 1 sftp.
Connecting from MS Windows
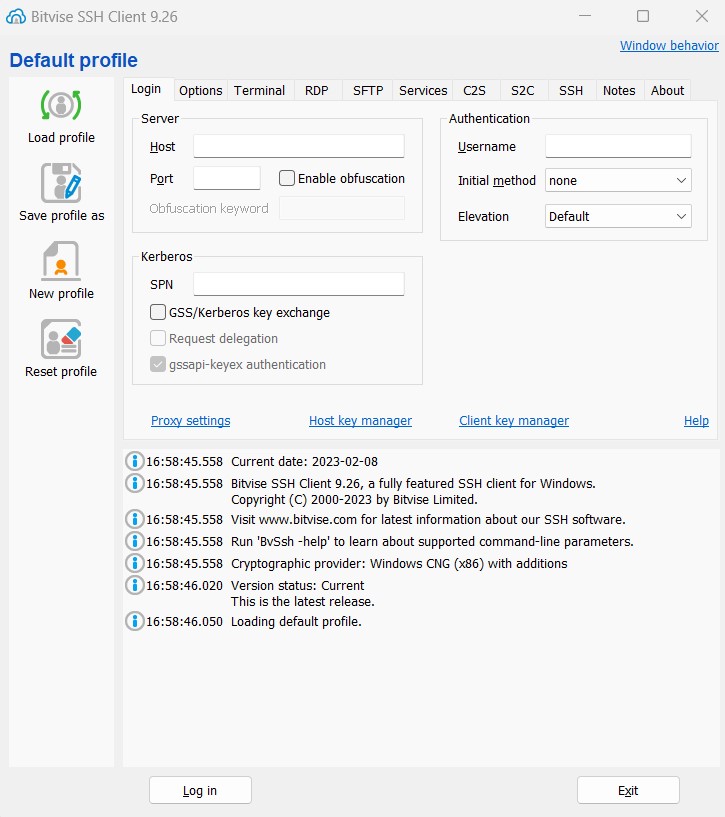
There are a number of SSH clients that can be used in MS Windows to establish connections with an SSH server. One of the best is Bitvise SSH client, that can be downloaded here and is free of charge.
It starts with a simple window in which the main parameters of the SSH server to connect to can be inputted. The default login method is the plain password, but it can also supports publick key login.
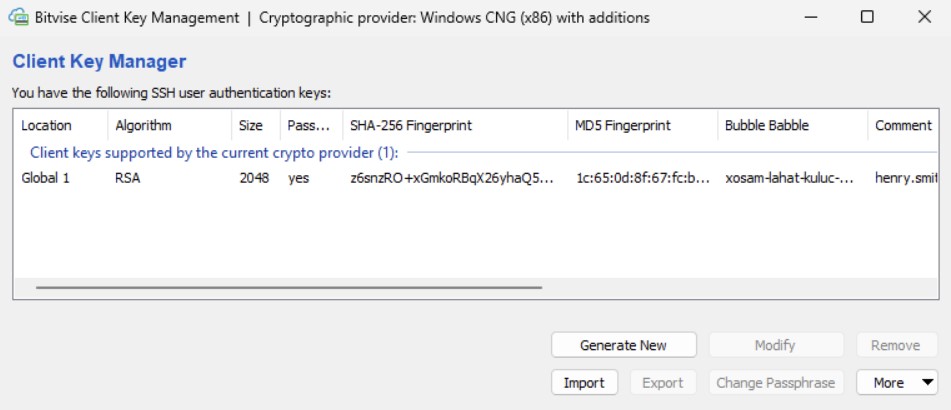
Private-public key-pairs can be added by clicking on Client key manager. It can accept keys generated by OpenSSH, or a new key-pair can be generated by pushing the Generate button in the key manager window. In the following picture, the private key previously generated for the user Henry Smith (i.e. the one saved in /home/henry/.ssh/id_rsa on myhost) was copied on the Windows machine and imported by pushing the Import button.
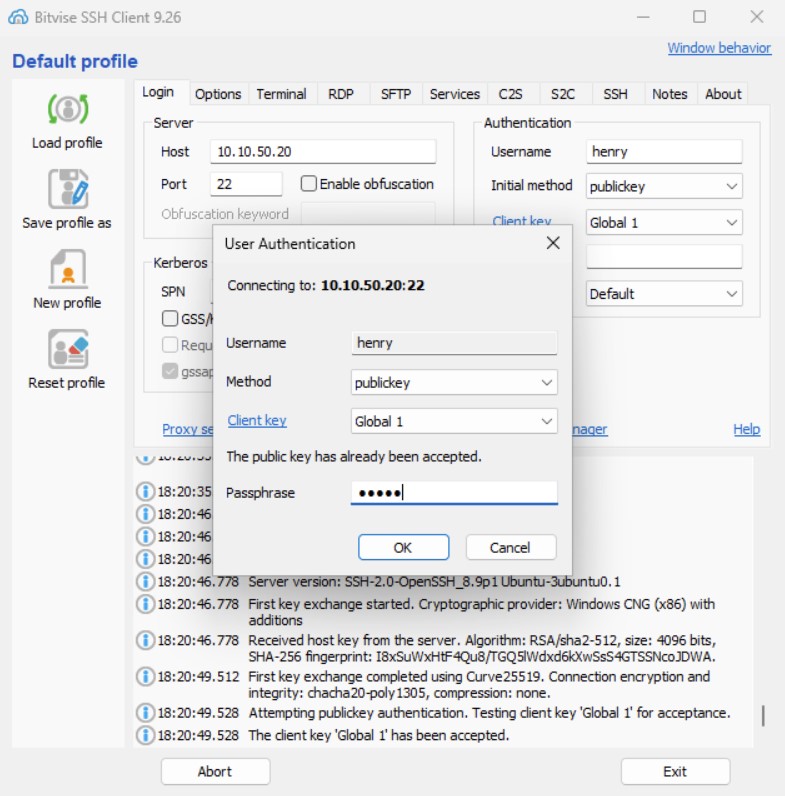
Now, we can try logging in otherhost by typing the IP address 10.10.50.20 and selecting henry as user with publickey authentication method. Bitvise will propose a valid private key and ask for the passphrase to unlock it.
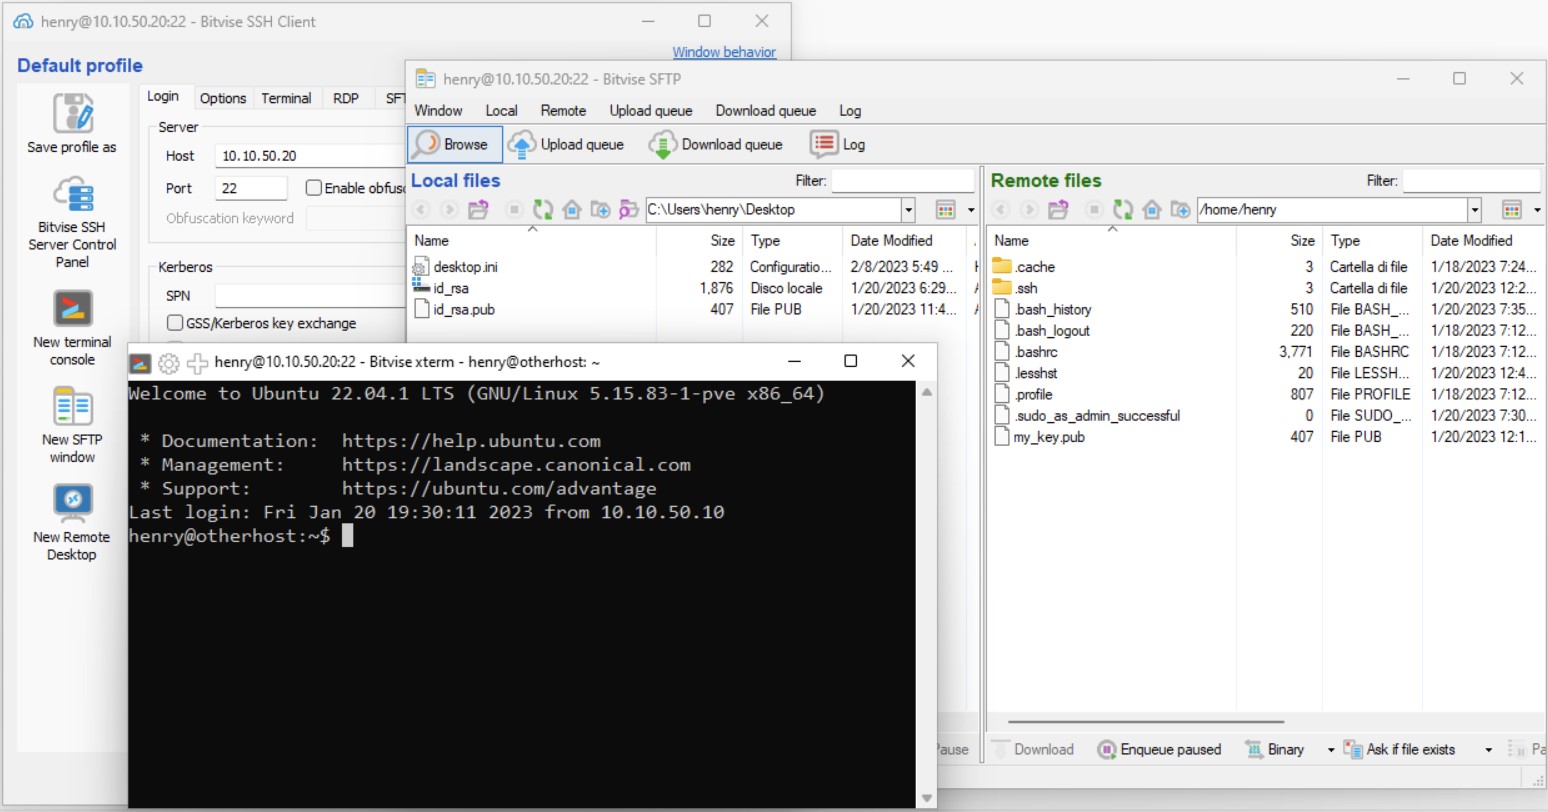
After the login takes place, terminal consoles and SFTP grphical interfaces can be opened by clicking on New terminal console and New SFTP window buttons, respectively, located in the left vertical menu bar.
X11 forwarding (display redirection)
In Unix/Linux systems, graphic capability is provided by the X11 server, that is, a server application running in the background and basically acting as a bridge to the graphical card. Applications with a graphical user interface must connect to an X11 server to print their graphical output and to interact with the user. Desktop installation of the various Linux distributions alredy install all the X11 stack and the desktop management environment needed to provide the user with a full graphical experience.
The connection to an X11 server can be either local, through a socket, or remote, through a TCP/IP connection. This means that, in a Unix/Linux environment, an application can run on a computer while sending the graphical output to another one. The DISPLAY environment variable controls this behavior. Since, by default, the connection to a display in a remote computer is unencrypted, security issures arise. Thus, the SSH system can be configured to create a secure tunnel so as to the graphical stream is encrypted and protected.
To understand how to do this, let us suppose that we want to run an application on otherhost and redirecting the graphical output to the host mydesktop, running Ubuntu Desktop 22.04.2 LTS and having ip address 10.10.50.30. Suppose that the user henry has a valid account on mydesktop.
The first thing to do is to check that otherhost has the minimum subsystem needed to establish a connection to an X11 server. Typically, server installations avoid installing the X11 stack to save space. Run the following on an elevated shell on otherhost to check the presence of the X11 stack:
root@otherhost:~# dpkg -l | grep xorg
root@otherhost:~#
If the output is an empty string, as happened before, it means that no X11 stack is installed. To enable X11 display redirection capabilities in otherhost, a minimal installation is suffient, this to avoid the very large footprint involved by a full installation of the X11 stack and the graphical environment. That is, we do not want to transform the server installation of otherhost in a desktop one. The minimum possible installation of the X11 stack can then be obtained by running the following command:
root@myhost:~# apt-get install --no-install-recommends --no-install-suggests xserver-xorg-core
Reading package lists... Done
Building dependency tree... Done
Reading state information... Done
The following additional packages will be installed:
  libbrotli1 libdrm-amdgpu1 libdrm-nouveau2 libdrm-radeon1 libegl-mesa0 libegl1 libepoxy0 libfontenc1 libfreetype6 libgbm1 libgl1
  libgl1-mesa-dri libglapi-mesa libglvnd0 libglx-mesa0 libglx0 libice6 libllvm13 libpciaccess0 libpixman-1-0 libsensors-config
  libsensors5 libsm6 libvulkan1 libwayland-client0 libwayland-server0 libx11-xcb1 libxaw7 libxcb-dri2-0 libxcb-dri3-0 libxcb-glx0
  libxcb-present0 libxcb-shm0 libxcb-sync1 libxcb-xfixes0 libxcvt0 libxfixes3 libxfont2 libxkbfile1 libxmu6 libxpm4 libxshmfence1
  libxt6 libxxf86vm1 x11-common x11-xkb-utils xserver-common
Suggested packages:
  lm-sensors xfonts-100dpi | xfonts-75dpi xfonts-scalable
Recommended packages:
  libgl1-amber-dri mesa-vulkan-drivers | vulkan-icd xfonts-base xcvt
The following NEW packages will be installed:
  libbrotli1 libdrm-amdgpu1 libdrm-nouveau2 libdrm-radeon1 libegl-mesa0 libegl1 libepoxy0 libfontenc1 libfreetype6 libgbm1 libgl1
  libgl1-mesa-dri libglapi-mesa libglvnd0 libglx-mesa0 libglx0 libice6 libllvm13 libpciaccess0 libpixman-1-0 libsensors-config
  libsensors5 libsm6 libvulkan1 libwayland-client0 libwayland-server0 libx11-xcb1 libxaw7 libxcb-dri2-0 libxcb-dri3-0 libxcb-glx0
  libxcb-present0 libxcb-shm0 libxcb-sync1 libxcb-xfixes0 libxcvt0 libxfixes3 libxfont2 libxkbfile1 libxmu6 libxpm4 libxshmfence1
  libxt6 libxxf86vm1 x11-common x11-xkb-utils xserver-common xserver-xorg-core
0 upgraded, 48 newly installed, 0 to remove and 0 not upgraded.
Need to get 34.2 MB of archives.
After this operation, 141 MB of additional disk space will be used.
Do you want to continue? [Y/n] y
Now, re-issuing the dpkg -l | grep xorg we can easy verify the actual presence of the X11 minimum stack.
root@otherhost:~# dpkg -l | grep xorg
ii  xserver-xorg-core       2:21.1.4-2ubuntu1.7~22.04.1     amd64       Xorg X server - core server
root@otherhost:~#
A basic set of X11 applications can be also installed with the following command:
root@myhost:~# apt install x11-apps
Reading package lists... Done
Building dependency tree... Done
Reading state information... Done
The following additional packages will be installed:
  fontconfig-config fonts-dejavu-core libfontconfig1 libxcursor1 libxft2 libxrender1 xbitmaps
Suggested packages:
  mesa-utils
The following NEW packages will be installed:
  fontconfig-config fonts-dejavu-core libfontconfig1 libxcursor1 libxft2 libxrender1 x11-apps xbitmaps
0 upgraded, 8 newly installed, 0 to remove and 0 not upgraded.
Need to get 2027 kB of archives.
After this operation, 6553 kB of additional disk space will be used.
Do you want to continue? [Y/n] y
The next step to do is enabling X11 forwarding over SSH on otherhost, i.e., on the server side. To do this, simply issue nano /etc/ssh/sshd_config and modifiy the following lines (in red):
#AllowAgentForwarding yes
#AllowTcpForwarding yes
#GatewayPorts no
X11Forwarding yes
X11DisplayOffset 10
#X11UseLocalhost yes
#PermitTTY yes
As can be seen, we are telling the SSH server to use the display number 10 just to avoid potential overlapping with the default one that assumes value 0, since this latter is the one used by the local display, when present. Now issue systemctl restart ssh.service to let changes take effect.
The user henry can now log in into the desktop machine mydesktop, connecting to otherhost via SSH with the command ssh -X -C 10.10.50.20, and launching applications with graphical output, such as xclock as shown in the following picture.
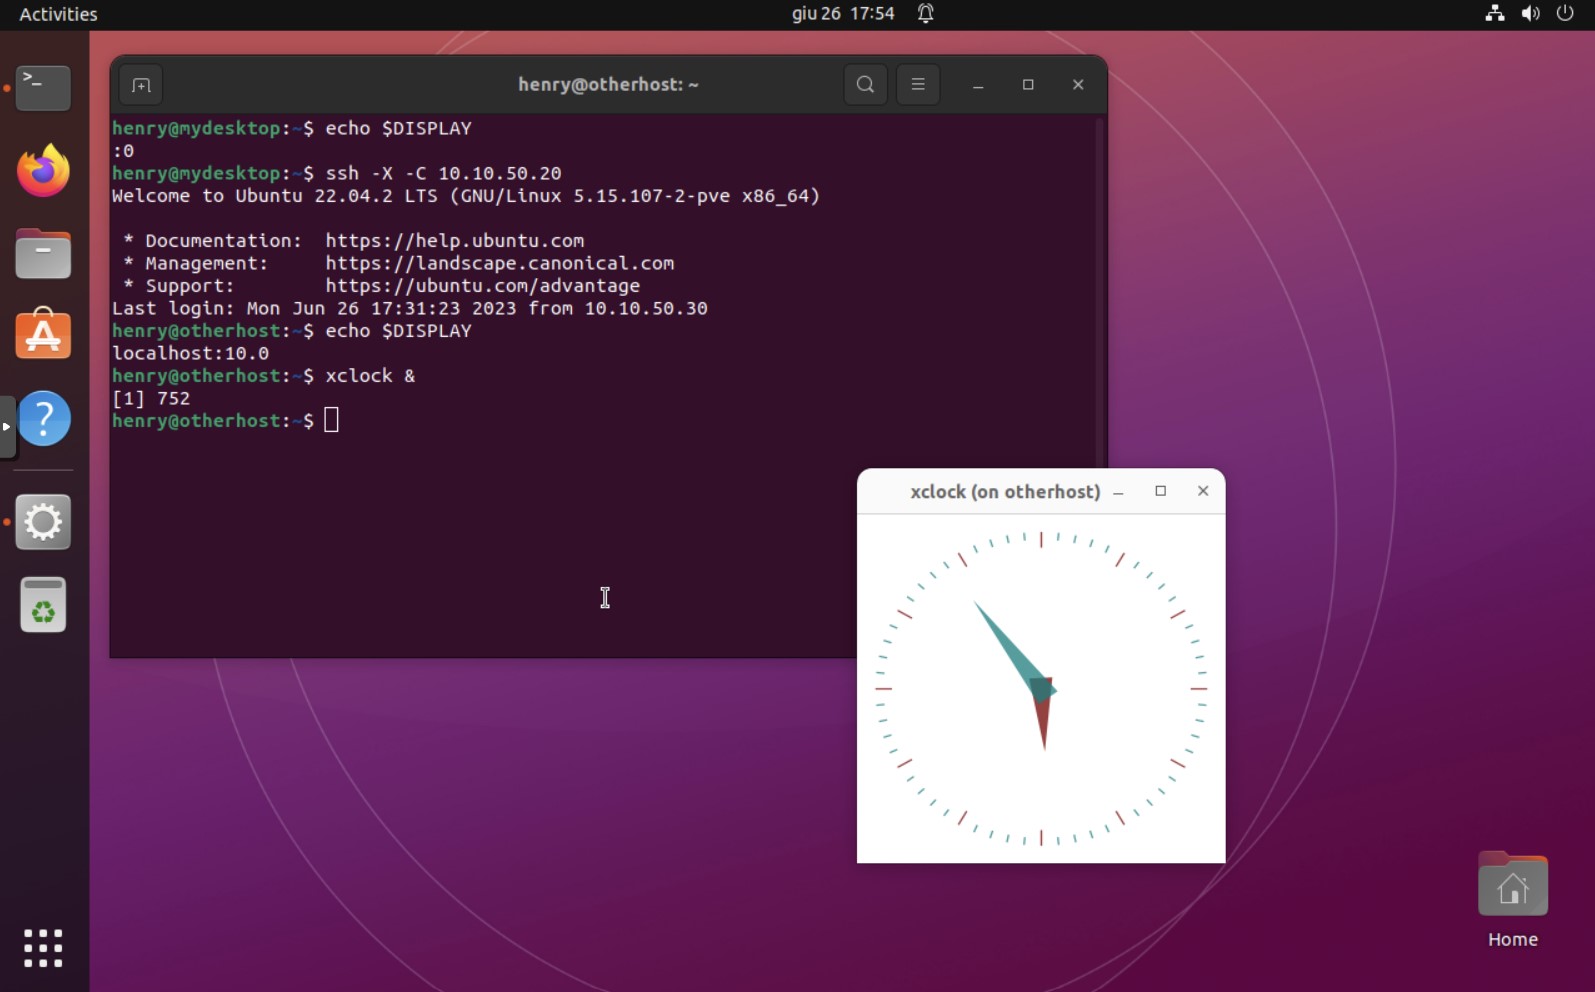
The -X flag tells the ssh command to initiate the X11 tunnel, while the -C flag enables the compression. Since the X11 communication protocol is a lot chatty, enabling the compression is mandatory to have sufficient responsiveness when the communication takes place over connections with slow ping time, such as DSL connections.
The picture also shows the output of the echo $DISPLAY command, printing the current setting of the DISPLAY environment variable. It returned value :0 when issued on the shell opened in mydesktop, meaning that a socket connection to the display number 0 is active (it is the default on the desktop machine), while it returned localhost:10.0 (equivalent to 127.0.0.1:10.0) when issued on the remote shell opened on otherhost. This means that any graphical application running on otherhost connects, by means of the X11 protocol, to the display port located at display number 10 on the local machine, which is not a real display port but instead a secured tunnel provided by the SSH server running on otherhost that, in turns, connects to the SSH client running on mydesktop, eventually redirecting it to the local display port 0 on mydesktop.
X11 display redirection can also be obtained on a MS Windows machine acting as desktop client, provided that an X11 emulator is installed. Xming X Server is a good X11 server emulation that can be used for this task. The version 6.9.x.x can be downloaded from this link and used free of charge. Bitvise SSH client is the other sotware needed, whose use is described in the chapter Connecting from MS Windows.
To show the connection procedure, let's now take a MS Windows desktop machine and install Xming X Server on it. At the time of this writing, the available executable is Xming-6-9-0-31-setup.exe. Righ click on the executable and select "Run as administator" to install Xming. The installation is straightforward; simply click to "Next" until the process has finished. Once started, Xming simply shows a small icon in the system tray. By default, it listens on display number 0.
Now, Bitvise SSH client can be started and configured to ask for X11 forwarding on the local display 127.0.0.1:0.0 (i.e., the one on which Xming is listening for connections). This setting can be found in the Terminal tab.
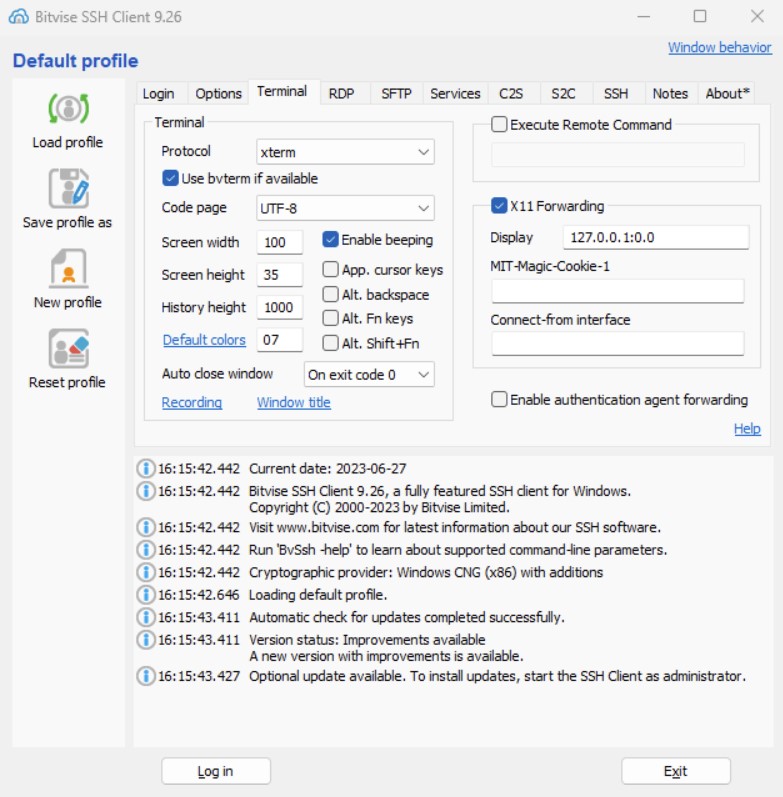
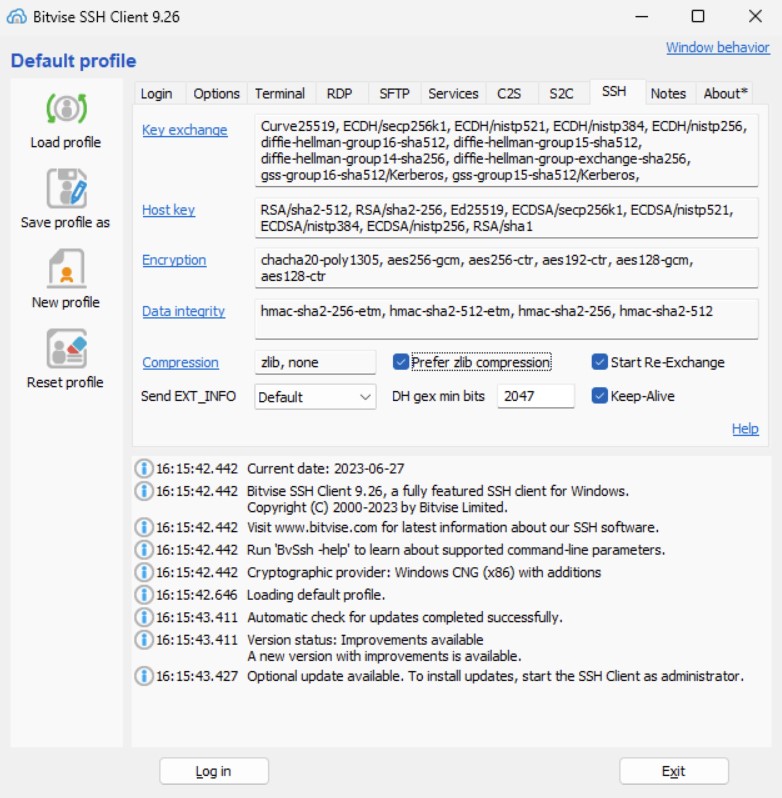
Moreover, in the SSH tab, the compression can be enabled by selecting "Prefer zlib compression".
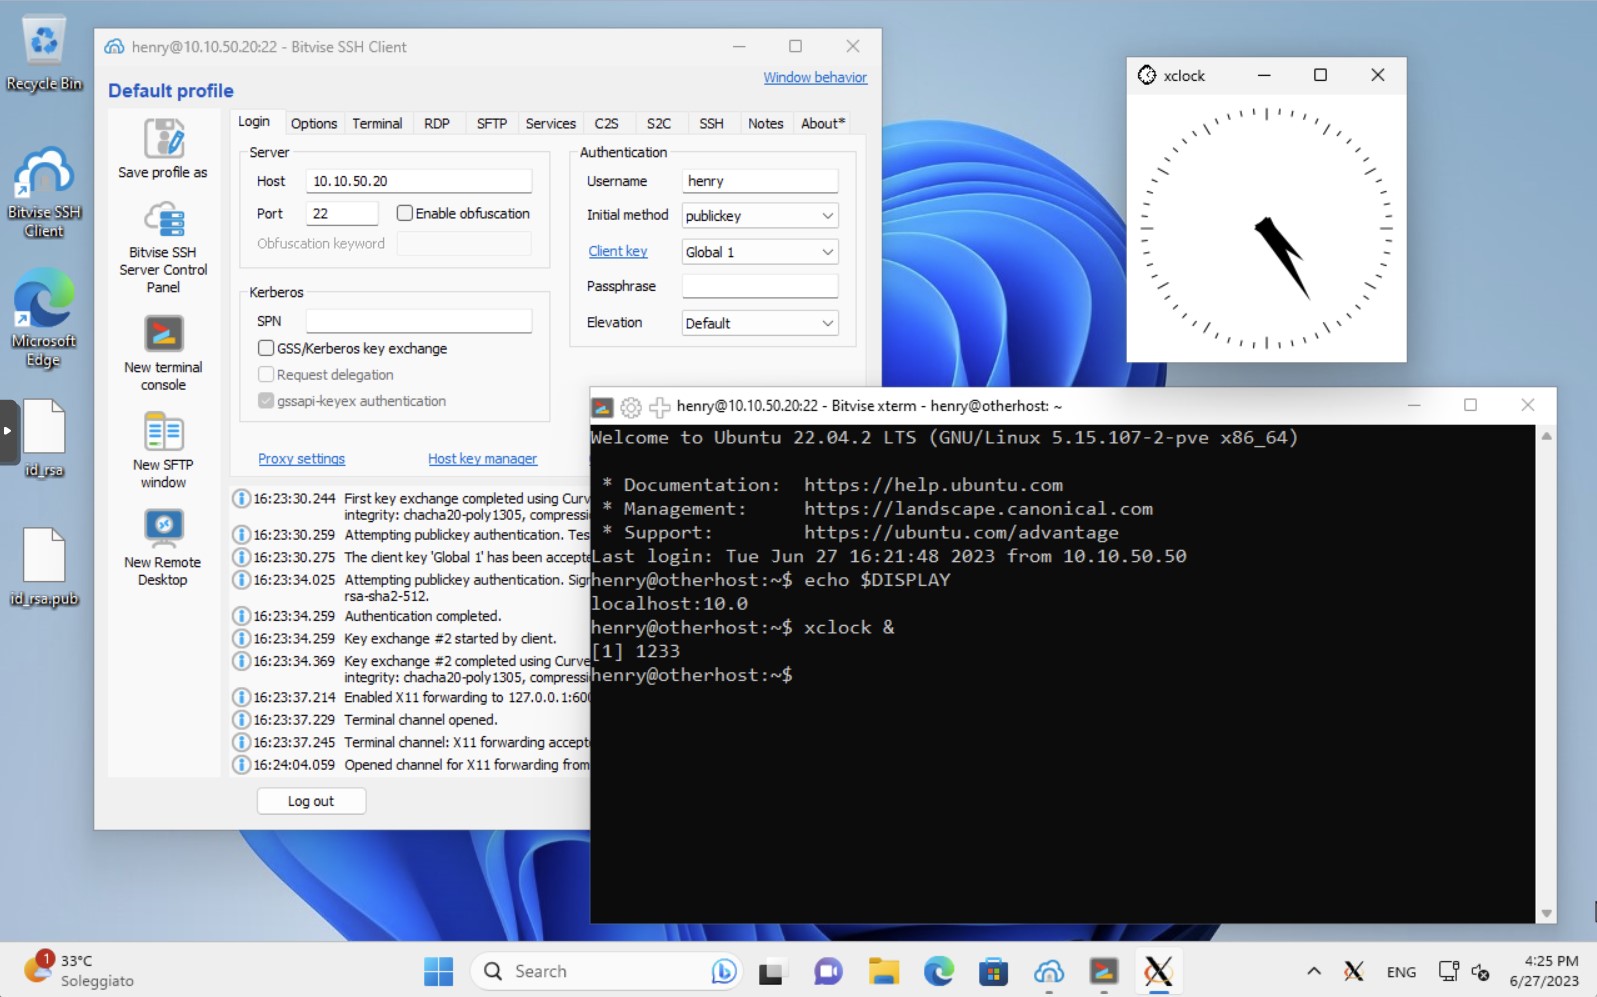
And that's all! We can connect to otherhost and starting applications with graphical interface, as shown in the following picture.
DISCLAIMER
The material and methods reported in Linux Admin Smart Guide, even if tested, are provided without any guarantee. All the commands are run as privileged (root) user, so it is highly recommended to try them first on non-production machines and, in any case, to always do backups first. Linux Admin Smart Guide is not responsible for any damage or data loss caused by misformulated commands or inadvertently launched commands.
To gain a root shell, run the command sudo su -l from the shell of a regular user who is included in the sudoers list, or simply the command su -l and then providing the root password.